Lab 01-01: Quectel BG-96 Cellular Module from Windows Simulator
FreeRTOS Port for Windows is referred as Windows Simulator
To simplify the development, the cellular module is tested using the windows simulator, without using any Host Processor. This shall enable the cellular module vendor specific interface to be tested in isolation. Especially vendor specific cellular modem ‘AT’ commands.
In this lab, we use the BG-96 shield board from here
FreeRTOS Code Structure
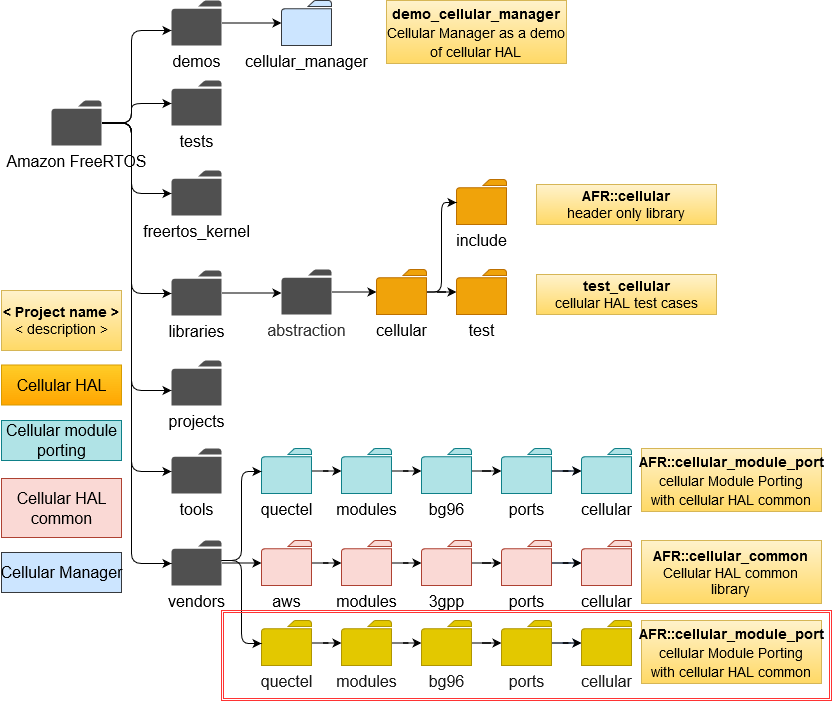
Below diagram shows the FreeRTOS directory structure of the cellular HAL library
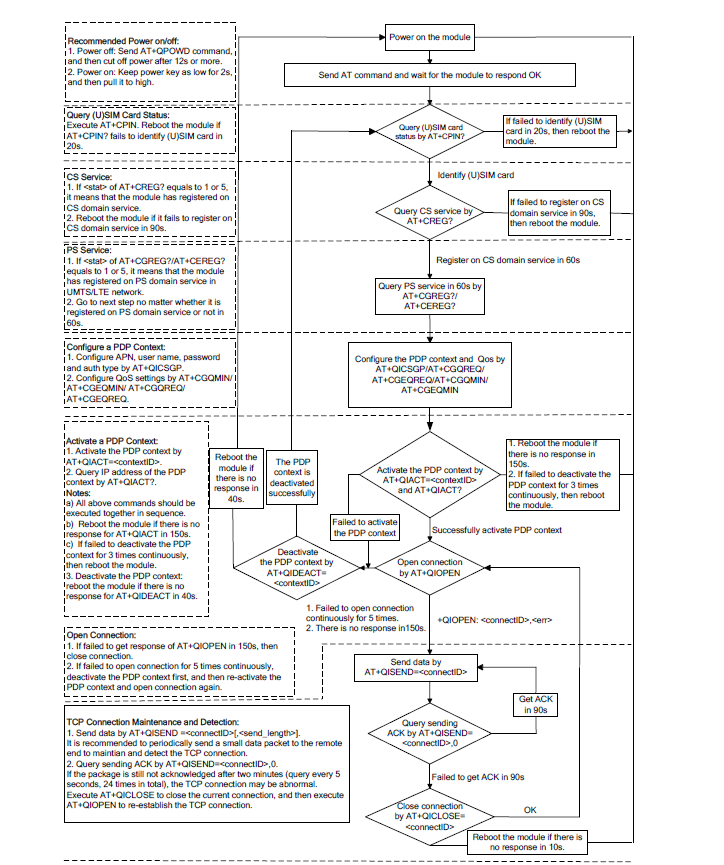
Flow Chart of TCP/IP commands for BG-96
Cellular Module Vendor Specific Porting Files
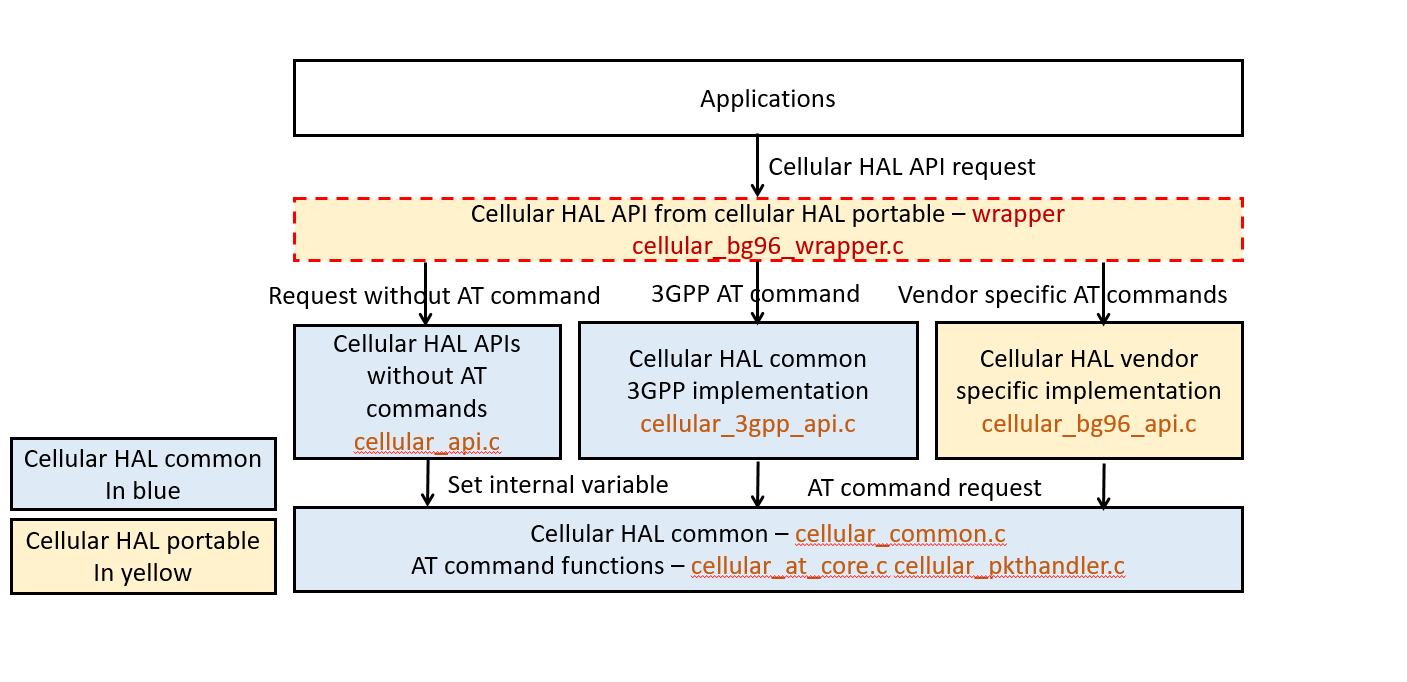
cellular__api.c - Vendor Specific ‘AT’ cmd implementation
cellular__urc.c - URC handler
cellular__wrapper.c - generic 3GPP Cmd Implementation
Application interface
./libraries/abstraction/cellular/include
cellular_api.h - cellular HAL apis
cellular_types.h - cellular HAL types
Cellular Module Common interface
./vendors/aws/modules/3gpp/ports/cellular/include
cellular_common_api.h - cellular HAL APIs provided by cellular HAL common
cellular_common.h - cellular HAL common functions helps to implement APIs
cellular_common_portable.h - cellular HAL common module porting interface
cellular_at_core.h - at command parsing function
Board porting interface
./libraries/abstraction/cellular/include cellular_comm_interface.h
Importing the Project
Cellular Module - Troubleshooting Cellular Network Connectivity Issues
[ ** Applicable only for first time Cellular IoT Module Users ]
-
Check you are using the right APN for the service provided by your carrier
-
Check the Antenna conenction to the LTE terminal on the board
-
Check the correct M2M SIM, service type, whether its active in the network
The below AT commands shall be used for troubleshooting. The commands are case-insentive
ATI - Returns the Product Identification information e.g. cellular module vendor name, module number, revision
AT+CEREG? Network Registration Status
AT+CGDCONT? Returns the current settings of the PDP context [+CGDCONT: 1,“IP”,“m2minternet”,“0.0.0.0”,“0.0.0.0”]
BG 96 Module Setup
Before we proceed with the freeRTOS setup, let’s setup the BG96 module and test the hardware connectivity is OK and the AT-cmd set is working
- Install the USB Device Driver from Quectel.sixfab
- Connect the USB to the Laptop []
- Insert SIM card
- Connect the LTE Antenna to the target
- Power On the board [power switch]
- Check the Powered ON status of the board
- Confirm USB drivers are installed correctly as shown below
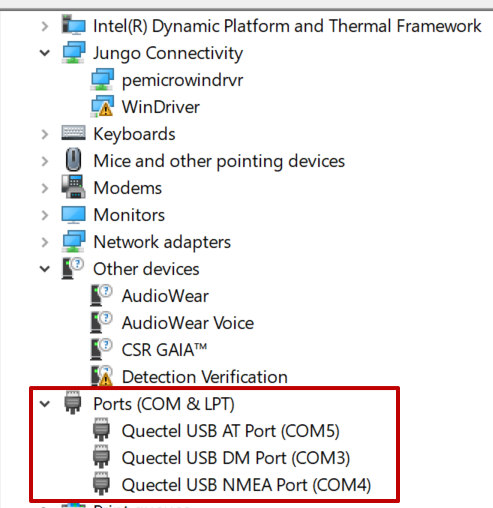
- Establish a serial connection with the board
- Verify the serial communication is OK and the cellular module is able to connect to the Telco Network
Establish a serial connection
A serial connection allows your board to send logging and debugging information in a form that you can view on your development machine.
With the cable connected, you can open a serial connection on a terminal emulator such as putty or terraterm. The baud rate is set to 115200 by default with 8 data bits, no parity, and 1 stop bit.
Steps to confirm the cellular modem is network connectivity is working OK
   AT [should return OK]
   AT+CSQ [Should return value as..not 99.99]
Build the MQTT Demo Project
Compile the aws_demos and ensure build is successful
  cd  $FR_BASEDIR\cmake-config-cellular.bat
  cd  $FR_BASEDIR\cmake-build-bg96.bat
Manual Adaption of Code to run aws_demos
The below procedure is a workaround
Problem:
If the laptop don’t have a wired ethernet connection the windows simulator environment wouldn’t start
Solution:
-
Navigate to the file, $FR_BASEDIR\vendors\pc\boards\windwos\aws_demos\application_code\main.c
-
Disable the IPInit and update the code as below to run the demos, in the main() function to manually to run the demos.
    prvMiscInitialisation();

    /* Initialize the network interface.
     *
     ***NOTE*** Tasks that use the network are created in the network event hook
     * when the network is connected and ready for use (see the definition of
     * vApplicationIPNetworkEventHook() below).  The address values passed in here
     * are used if ipconfigUSE_DHCP is set to 0, or if ipconfigUSE_DHCP is set to 1
     * but a DHCP server cannot be contacted. */
	//FreeRTOS_printf(("FreeRTOS_IPInit\n"));
	//vApplicationIPInit();

	vDevModeKeyProvisioning();
	SYSTEM_Init();

	DEMO_RUNNER_RunDemos();

    /* Start the RTOS scheduler. */
    FreeRTOS_printf( ( "vTaskStartScheduler\n" ) );
    vTaskStartScheduler();
Manual Update of Configuration Files
There are some user specific configurations e.g. AT Cmd port & the Cellular Network Specific Configurations e.g. APN Name etc., These configurations need to be updated in a new header/c files, prior to compiling the MQTT demos
Cellular module communication setup
- Edit the source file to specifiy the COM port for windows simulator “vendors/pc/boards/windows/<aws_demos or aws_tests>/config_files/aws_cellular_config.h
#define cellularconfigCOMM_INTERFACE_PORT “<QUECTEL_USB_AT_PORT_NUMBER>”
Cellular Network communication setup
- Edit the file “vendors/pc/boards/windows/aws_demos/config_files/aws_demo_config.h”
#define democonfigNETWORK_TYPES ( AWSIOT_NETWORK_TYPE_CELLULAR )
- Edit the file “vendors/pc/boards/windows/aws_demos/config_files/aws_iot_network_config.h”
#define configSUPPORTED_NETWORKS    ( AWSIOT_NETWORK_TYPE_ETH | AWSIOT_NETWORK_TYPE_CELLULAR )

#define configENABLED_NETWORKS      ( AWSIOT_NETWORK_TYPE_ETH | AWSIOT_NETWORK_TYPE_CELLULAR )
3.Edit the file “vendors/pc/boards/windows/aws_demos/config_files/aws_secure_sockets_config.h”
#define socketsconfigBYTE_ORDER <host mcu byte order>
4.Edit the file “demos/include/aws_cellular_demo.h”
#define configCELLULAR_APN "m2minternet"


#define configCELLULAR_DNS_SERVER "8.8.8.8"
Testing the AWS IoT Core connectivity
Command line
Build the aws_demos by running the below commands. The cmake-config-bg96.bat is required only if you are running for the first time.
FreeRTOS Windows Port has a strict dependency with Visual Studio versions.
Below versions are tested to be working Visual Studio 2019 : 16.3.1, 16.5.2/ Visual Studio 2017 15.9 from here
To configure the build use the below command
cmake -DVENDOR=pc -DBOARD=windows -DCOMPILER=msvc -G"Visual Studio 16 2019" -DSECURE_SOCKETS_CELLULAR=1 -DBOARD_HAS_CELLULAR=1 -B build-bg96
To Build use the below command
cmake --build build-bg96 --clean-first
Save the commands to a batch file and place under the $FR_BASEDIR
cd  $FR_BASEDIR\cmake-config-bg96.bat

cd  $FR_BASEDIR\cmake-build-bg96.bat
More information on running FreeRTOS port for windows can be found here
AWS IoT Test console
Before continuing, login to the AWS Console, and then navigate to the AWS IoT Core console.
- On the left-hand side, click the Test menu item.
- For the subscription topic, enter
# - Click the
Subscribe to topicbutton.
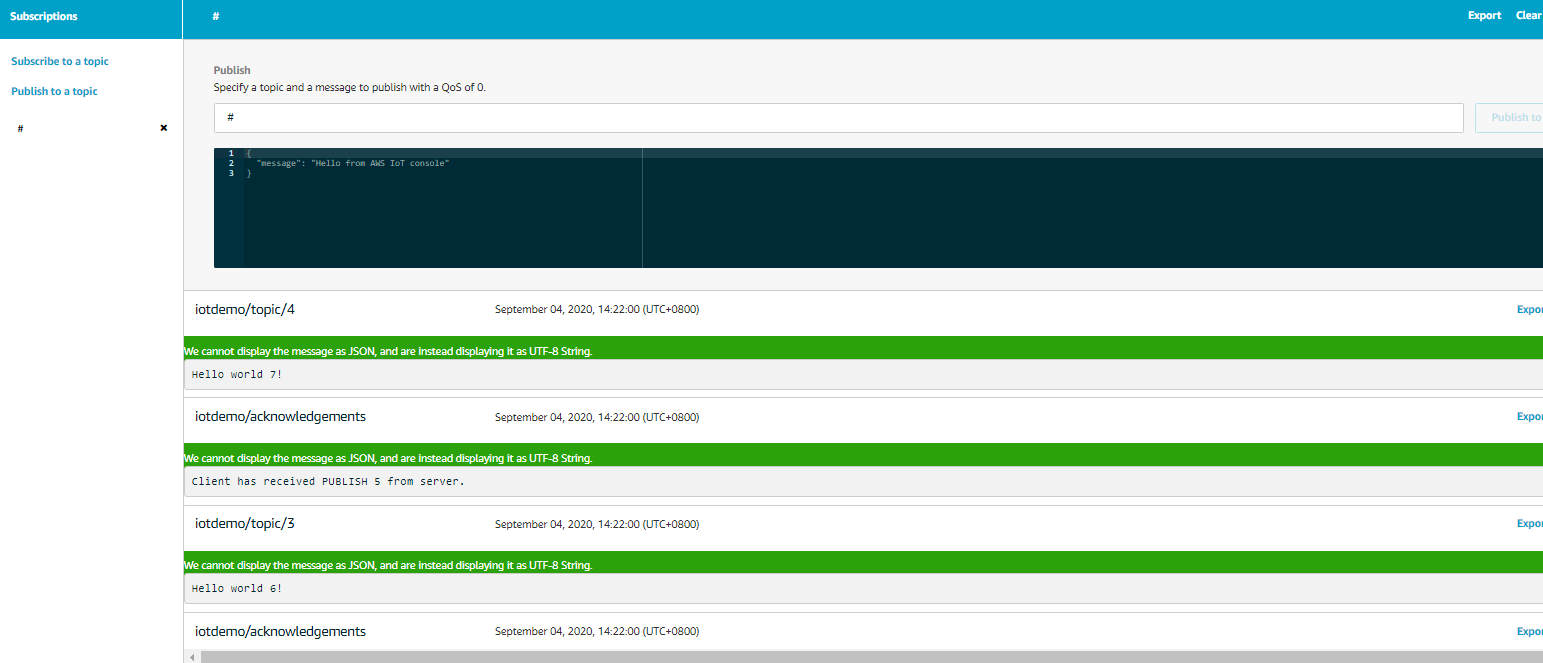
This will enable to verify the correct transmission of MQTT messages from the windows simulator thtu BG-96 to the AWS IoT Core broker.
Run the demo from the folder
$FR_BASEDIR\build-bg96\Debug\aws_demos.exe
The demo should now be running.
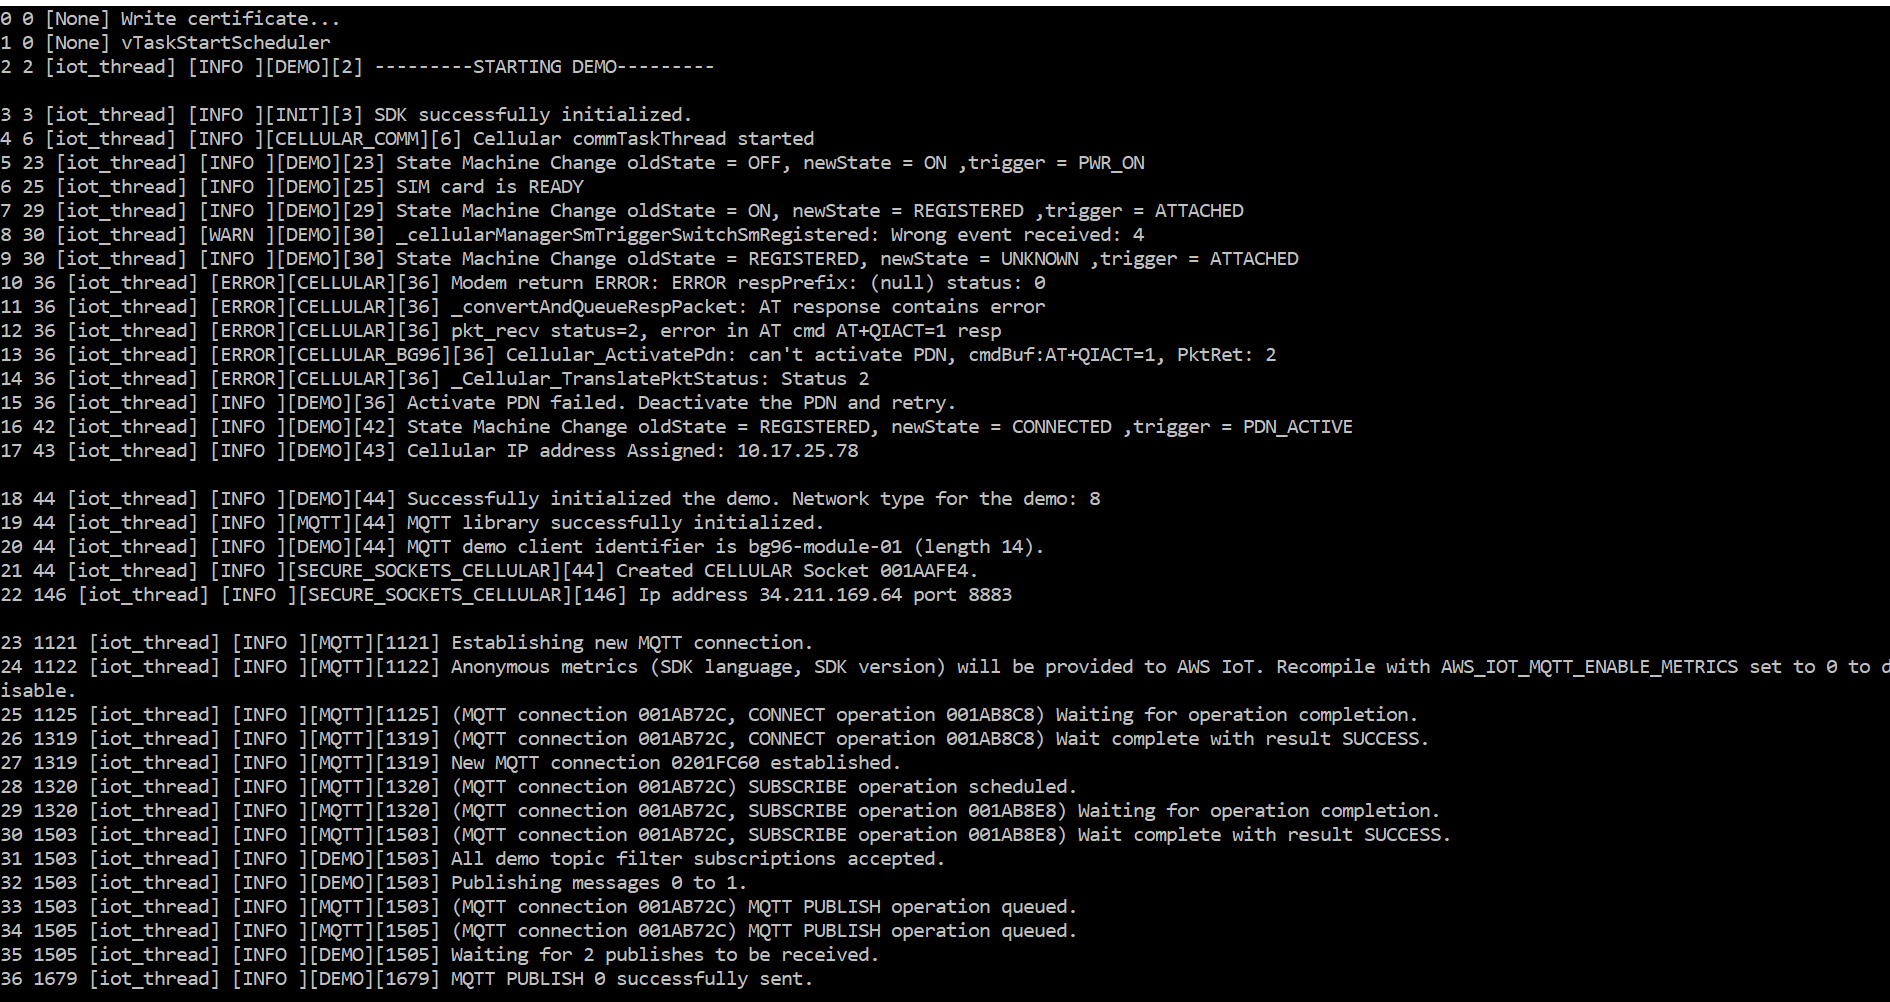
When completed, the output in the aws iot console will be similar to the following.
BG 96 Specific Implementation Details for AWS IoT Core access
1.FreeRTOS “Standard Demos”, has a Network Manager that is used to handle different types of network connections and their Connection disconnection events at the user application layer.
2.The cellular network is initialised by the aws_iot_network_manager service.
3.Upon successful registration to the cellular network, TLS socket connection is created for application access. Note that
-
BG 96 module supports the following three kinds of data access modes:
- Buffer Access Modes
- Direct Push Mode
- Transparent access
FreeRTOS Cellular HAL Implementation use “Buffer Access Mode” to receive data from the cellular module.