Lab 00-01: Environment Setup
In this Lab we are going to prepare several items mandatory in order to ensure a smooth connection of your Device (Board) to AWS platform that will be essential to continue the following Labs
Environment Setup
Before you begin: This workshop is based on the new Amazon FreeRTOS CMake build system. It Uses Visual Studio Code (or) Visual Studio as IDE and can be executed in Windows10. The Lab are tested on Windows 10 and can be easily adapted to other platforms.
Setup lab will organize the development environment prerequisites onto your workstation. These tools are required to not only successfully complete the labs but set the foundation for developing solutions on AWS with the cellular connectivity.
In this lab, you will accomplish the following:
- Install required software.
- Prepare AWS IoT Core configuration objects and artifacts.
Install Required Software
Initializing the Repository
In this section, you will learn the physical directory layout for Amazon FreeRTOS. You will clone the git repository that include the FreeRTOS (202007 version), as a git repository submodule.
From your Home directory, check out the sources.
- Open the Git Bash shell on your workstation to perform work on the command line.
- Clone the repository.
Windows
Make /c/src to ensure path lengths are short.
mkdir /c/src
cd /c/src
git clone https://github.com/aws/amazon-freertos.git --recurse-submodules -b feature/cellular
In your HOME directory, you should now have directory amazon-freertos.
From this point onward, and throughout the remaining labs, the repository checkout directory is referred to as FREERTOS_BASEDIR.
Troubleshooting the Build
If the CMake configuration was unsuccessful on the first attempt, you will need to delete the ${workspaceRoot}/amazon-freertos/build folder before running the CMake configuration again. This will delete your CMake configuration so that you can create a fresh configuration.
Python and AWS cli Setup
Python is required for running AWS IoT test scripts and using the AWS CLI.
On Windows, Python may not be installed on your system.
After Python installation, ensure that you install Pip and then the AWS CLI.
AWS CLI Installation and Configuration
Install the AWS CLI using pip.
pip install awscli
Configure your credentials.
Please refer to https://docs.aws.amazon.com/polly/latest/dg/setup-aws-cli.html for more details
Run the following command to configure the AWS CLI.
aws configure
If you see output similar to the following, you can move to the next section since your AWS CLI configuration has already been configured. You can press CTRL-C.
$ aws configure
AWS Access Key ID [****************UDXA]:
Otherwise you need to get AWS programmatic access credentials to configure the AWS CLI.
- Login to the AWS Console.
- Click Services > IAM.
- Click Users.
- Click Add user and enter user name of your choice.
- Enable ‘Programatic access’ check box in Access type.
- Click Next:Permissions button. Click Attach existing policies directly.
- In the filter box enter iot.
- Enable ‘AWSIoTConfigAccess’
- Click Next:Tags button.
- Click Next:Review and finally click Create user button.
- Download user security credentials file credentials.csv.
Now, enter aws configure once more. Open credentials.csv file and copy the Access Key, Secret Key, Region (i.e. eu-central-1 or eu-west-1), and format (json) when prompted.
You can choose one of the available regions on the navigation bar of the AWS Console. For example if you choose
Oregonas your region you will see that the URL changes to https://us-west-2.console.aws.amazon.com/console/home?region=us-west-2#. In this case the region to enter when asked by aws configure command would beus-west-2.
- Confirm the AWS CLI is working. This can be verified by running the below command in the console
aws iot describe-endpoint
Step 2 - Provisioning the device
The device can be provisioned using multiple approaches i.e. via., CLI (or) from the AWS IoT Management Console
Registering your device to AWS IoT typically involves the below steps
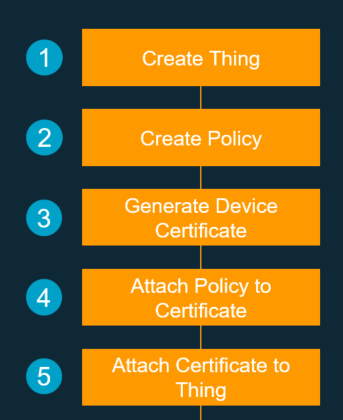
More details can be found here
AWS IoT device provisioning - using aws-cli
The multi-step procedure has be simplified by the script available under FREERTOS_BASE_DIR\tools\aws_config_quick_start
This approach is based on the SetupAWS.py script. This script supports only development kits without a secure element. The script automates the process outlined at https://docs.aws.amazon.com/freertos/latest/userguide/freertos-prereqs.html and configures the files aws_clientcredential.h and aws_clientcredential_keys.h to connect to AWS IoT.
Refer to FREERTOS_BASE_DIR\tools\aws_config_quick_start\README.md for more details.
Edit FREERTOS_BASE_DIR\tools\aws_config_quick_start\configure.json to update all the parameters, including thing name, wifi_security:
For cellular devices the wifi_security isn’t applicable, however the script expects this as a mandatory parameter.
The scripts help to setup the cloud side resources required for the IoT device identity & authorisation/policies with the AWS IoT core service
`` {
"afr_source_dir":"../..",
"thing_name":"$thing_name",
"wifi_ssid":"$wifi_ssid",
"wifi_password":"$wifi_password",
"wifi_security":"$wifi_security"
}
``
In the command terminal navigate to path FREERTOS_BASE_DIR\tools\ aws_config_quick_start\ From the command shell, run the python script SetupAWS.py with setup option as shown below:
python SetupAWS.py setup
The script creates a Thing with the name you specified, generates certificates and policies, attaches the certificates and policies to the thing, and updates the aws_clientcredential.h and aws_clientcredential_keys.h files at the path FREERTOS_BASE_DIR\demos\include\ folder.